
Implementing multi-threading in WinForms using the BackgroundWorker class
Posted by Fernando Felman on April 4, 2007
I’ve been asked how to implement multi-threading in .Net 2 quite a few times. The last time was specifically for multi-threading in WinForms and that is the focus of this post. Note that the techniques discussed in this post can be easily adopted to any .Net 2 application (and not just WinForms).
In a multi threaded environment you will have one thread handling the GUI controls and one or more worker threads performing time-consuming operations. The requirements of a multi-threaded solution (regarding the worker thread/s) will be:
- The ability to start a worker thread (a logical operation) in an asynchronous manner
- The ability to get status notifications from the worker thread and communicate the updated status to the user
- The ability to terminate the worker thread by request of the user
- The ability to handle errors that occurred in the worker thread during its operation
Starting from .Net 2 we can use the BackgroundWorker class (from the System.ComponentModel namespace) which handles many of the tedious plumbing tasks for us. The BackgroundWorker class support asynchronous activation, status updates, worker termination and the wrapping of any error thrown by the worker thread. This class can be used in any .Net 2 environment (and not just WinForms environments).
In this post I’ll walkthrough a multi-threaded WinForms application. Please download the sample application source code from the CodePlex project Release page. We will create an application to find prime numbers: the user will insert the limit to search and the application will find all prime numbers in that limit. The user should see a status bar progressing for each number tested and a list of prime numbers that will be filled during the process. The user should also be able to cancel the operation at any time.

Setting up the BackgroundWorker component
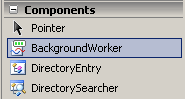
OK, let’s start by creating a C# Windows Application. In designer of the form, add the BackgroundWorker component from the “Components” category:
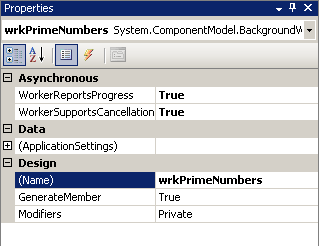
The component is added to the bottom section of the designer (where all the non-graphical components are displayed). Click it and change the following properties in the “Asynchronous” section:
WorkerReportsProgress: True – this allows us to send progress notifications
WorkerSupportsCancellation: True – this allows us to cancel the operation at will
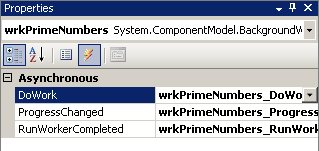
Switch to the events view of the property editor and double-click on all the events:
We now accomplished all the plumbing tasks of the multi-threaded application. We’ve an asynchronous activator that will notify progress and can be stopped. Now we’ve to add the logic of the application – that is, finding prime numbers and attaching the worker to GUI controls.
In the form there are some controls so the user can interact with the application: a number field, a start/stop button, a progress bar and a logger text box. We now have to use those controls with the worker.
Starting an Asynchronous task: using the RunWorkerAsync method and DoWork event
The background task is handled in the DoWork event. The handler for this event will be called from a new worker thread so the task you perform there will not clutch the GUI. To start doing the work just call the RunWorkerAsync. You can also pass an optional initiate state which will be wrapped up and served in the argument of the DoWork event handler:
this.wrkPrimeNumbers.RunWorkerAsync(maxNumToTest);
Calling the RunWorkAsync will create a new worker thread (so the GUI thread won’t be cluttered) which will execute the DoWork event handler: private void wrkPrimeNumbers_DoWork(object sender, DoWorkEventArgs e)
Note how the initiate state we passed to the RunWorkAsync method is served in the event’s argument:
int limit = (int)e.Argument;
It is important to notice that the argument received in this handler is used further on in the flow. I’ll touch this in the appropriate phases, but for now it’s important to remember that this argument may hold information that will be used when the task is completed. One such property is the result. I use the result property to save the number of prime numbers found in the range:
e.Result = foundPrimeNumbers;
Updating work progress: using the ReportProgress method and the ProgressChanged event
Right now the DoWork event handler is doing some time-consuming work without cluttering the GUI. Now we’ve to notify the user about the progress of the work. This is done in the ProgressUpdate evet. In order to notify about the progress you should call the ReportProgress method from the DoWork event handler:
wrkPrimeNumbers.ReportProgress(progressPercentage, currPrimeNumber);
The progress percentage is always passed and you can also pass an optional state (I use this optional state to send the prime number when one is found). This call will execute the ProgressChanged event handler:
private void wrkPrimeNumbers_ProgressChanged(object sender, ProgressChangedEventArgs e)
And here’s the great thing: the code in the event handler is executed using the GUI thread so it’s safe to update the GUI controls without changing threads (no mode InvodeRequired!). Like in the case of the DoWork, the event handler is served with the state:
this.pgbTestedNumbers.Value = e.ProgressPercentage;
Since the event handler is executed from the GUI thread, it’s safe to update the progress bar without switching thread contexts.
Note: the ReportProgress method will work only when the WorkerReportsProgress attribute of the BackgroundWorker class is set to true. We did that in the designer.
Handling completion: using the RunWorkerCompleted event
Now we’ve an asynchronous task working in the background and notifying the user of its progress. When the task is done it will raise the RunWorkerCompleted event. And again, the great thing about this event is that it’s called using the GUI thread, so it’s safe to update the GUI controls:
private void wrkPrimeNumbers_RunWorkerCompleted(object sender, RunWorkerCompletedEventArgs e)
It’s important to understand that this event will always be called when the task is done. The argument of this event contains data regarding the 3 different ways the task has finished:
- Result: used when the task completed normally. This property contains the result of the of the task. Notice that if the task did not completed normally, accessing this property will throw an exception.
- Cancelled: used to determine whether the user cancelled the task
- Error: used when the task failed due to an error. This property contains the exception that caused the task to fail.
The Result and Cancelled properties are set manually in the DoWork event handler and the Error is set by the component when an exception is thrown. This means that you shouldn’t surround the DoWork code with try..catch if you want the error to bubble all the way to the RunWorkerCompleted handler.
Checking working status: using the IsBusy property
Let’s now add the cancelling feature: we want to give the user the ability to cancel the task if it takes too much time. But before we do that, we have to know if we’re busy handling a task or if we’re idle. This should help us decide whether to start a new asynchronous task or to cancel the current one.
This is easily done without the need to query the threading system, all you need to do is check the IsBusy property of the BackgroundWorker class. Too easy, eh? 🙂
I used that property in the Click handler of the start / stop button to decide what action to do:
if (!wrkPrimeNumbers.IsBusy)

// start a new task

else

// stop the current task
Cancelling on-going work: using the CancelAsync method and CancellationPending property
Cancelling an event is done by calling the CancelAsync method. This method can be called from any thread, so it’s OK to call it from the Click handler of the start / stop button. The method will set a property in the worker object so the DoWork event handler will have the ability to act on that.
The CancelAsync method will set the CancellationPending property of the BackgroundWorker class. This property should be periodically checked by the DoWork event handler, and when it’s set to true the handler should cancel its work by: setting the Cancel property of the argument to true and exiting the function. Here’s how I did that in my sample:
if (wrkPrimeNumbers.CancellationPending)

{

// user canceled

e.Cancel = true;

break;

}
As we mentioned previously, the cancel property of the DoWork argument is forwarded to the Cancelled property of the RunWorkerCompleted event handler.
Note: the CancelletionPending property will only be updated when the WorkerSupportsCancellation attribute of the BackgroundWorker class is set to true. We did that in the designer.
So that’s it! We completed our application and we did that without once querying the System.Threading namespace. The BackgroundWorker component wrapped everything for us in a nice Method / Event / Property flow. How great is that?
Epilogue: using the BackgroundWorker class with .Net 1.1
If you’re using .Net 1.1 you’re probably reading this post with both anger and despair.There’s no BackgroundWorker class and you’ve to handle all the plumbing by yourself. But wait, how great would it be to use a .Net 1.1 class with the same features?
Well, in that case, you’d better notice that Juval Löwy published a great step-by-step implementation of the BackgroundWorker class for .Net 1.1: http://www.devx.com/codemag/Article/20639/0/page/1.
Have fun!
Using anonymous methods to invoke methods with typed parameters
In this article I didn’t needed to switch threads between the worker and the GUI. This was done by using the events of the BackgroundWorker class which are called using the correct thread contexts. But what if you need to switch threads from the worker to the GUI? Well, there’s an easy way to do it in .Net 2 using anonymous methods and without using pre-defined delegates. Here’s a sample:

The great thing about this code is that the invoker is typed (so the arguments are checked in compile time) and it’s being done without defining a delegate. Node that the delegate keyword creates an anonymous method and returns an object which is not derived from the Delegate class, that’s why I use the MethodInvoker class which derives from the Delegate class and so it can be used to the Invoke method of the control class.

Rajiv said
Hi,
Thank you very much. The article was very helpful.
Danny said
Thank you very much, that was very helpful, exactly what I was looking for.
demonrush said
Sir, I think you forgot to sleep the thread. cmiiw
thx for this article.
Fernando Felman said
demonrush,
you’re absolutely right. well spot!
the only reason i can give for the thread not being idle is that i coded that on multi-core cpu which gave me more power to handle events.
oh well, the good thing is that the concept is understood. 🙂
cheers!
Wei said
Hi,
Is there any way to make it wroks on modeless winform?
Thanks.
Wei
Fernando Felman said
Hi Wei,
I’m not sure I understand your question – can you please clarify what you’re trying to achieve?
This technique can be used on any implementation including WinForm, WebForm and even Console applications (though you’ll have to manually set the properties – the designer won’t be always supported by the IDE) so the usage of this class in a modeless form should be supported.
Cheers,
F
varsha said
sir you are great. I was looking for one site that had enough information regarding BackgroundWorker.
this is so helpful for me.
Thanks a ton 🙂
Ajay Sharma said
So simple to understand this is beautiful work..
Takashi said
Many thanks. But when I run the application to determine prime numbers upto 999,999 – which takes a while for the program to run – I was unable to stop the program manually. The stop button wouldn’t response when I clicked it and the program keeps running until all prime numbers (upto 999,999) were found. I am using Visual Studio 2010.
domemporm said
Man .. Excellent .. Superb .. I will bookmark your blog and take the feeds alsoI am satisfied to find so many helpful info here within the post, we’d like develop more strategies in this regard, thank you for sharing. . . . . .